2.26.2010

Late Morning Tartine


With James in one arm, I casually made this stunning snack without any intention of blogging about or photographing it. Then I stood there for a moment, taking in it's beauty and thought it would be criminal not to post this delightful little piece of heaven. I make variations of this all the time...the basic vehicle is a Wasa cracker spread with cream cheese. Then I have a look around and decide what to throw on top. Usually it's avocado sprinkled with sea salt and freshly cracked pepper, sometimes it's thinly sliced apples, in which case I opt for brie (instead of cream cheese) and drizzle a little honey over the top. Today, it was dried cherries and mint, inspired by a compelling little recipe I adapted from my newest cookbook, Blue Eggs and Yellow Tomatoes, by Jeanne Kelley. Kelley uses toasted whole grain bread with ricotta, which also sounds fantastic. I am loving her book for many reasons, one of which is the fact that she uses mint everywhere, and I currently have two mint plants on my kitchen sill that look at me auspiciously every time I go near them. (Really, they do!)

          1 Wasa cracker (I like the "Fiber")
          enough whipped cream cheese to spread
          4-6 dried cherries
          4-6 small mint leaves
          honey for drizzling

Simple, lovely, tasty. 


Adapted from Jeanne Kelley, Blue Eggs and Yellow Tomatoes.

2.23.2010

Orange and Lemon Olive Oil Cake


Wow. This is my ideal cake. Not too sweet, the perfect texture, infused with citrus flavor, and dusted with powdered sugar. I've never been one for sugary, frosted, over the top cakes with layers and fancy fillings. I'll admit to enjoying a few bites here and there on a special occasion, but I prefer simpler cakes that aren't too sweet and showcase the pure flavors of fruit. Cakes that would be perfect with a cup of tea in the afternoon. And this is exactly that. What's more...as it's name implies, it has no butter, offering instead the comfortably familiar and virtuous flavor of that esteemed oil known as olive.

The recipe calls for simmering the citrus for thirty minutes, and let me just tell you that this simple act alone resulted in great happiness. The house smelled divine - I was already enjoying the cake and it wasn't even on the plate yet. There's something about cooking the orange and lemon that removes the bitterness from the rind, which is later ground into a fine paste and incorporated into the batter. And I haven't yet mentioned that there are toasted almonds to look forward to as well. Please do yourself a favor and toast raw almonds yourself if you usually buy them. At least for the purposes of this cake. They will taste much fresher, make the house smell even better than it already does, and make the whole shebang that much more rewarding.

And now, in case you aren't already convinced, I can say with confidence that it's not just me who liked this cake. I served it to friends at dinner and EVERYONE had a second slice. In fact, I'm pretty sure Dan had a third. If that doesn't give meaning to "the proof is in the pudding", I don't know what does.


          1 small to medium orange
          1 lemon
          6 ounces raw almonds
          1 cup all-purpose flour
          1 Tbsp. baking powder
          4 large eggs, ideally at room temperature
          ½ tsp. table salt
          1 ½ cups sugar
          2/3 cup olive oil
          Confectioners’ sugar, for dusting

Put the orange and the lemon in a saucepan, and cover with water. (They’ll float - no worries.) Bring to a boil over medium-high heat; then reduce the heat to medium and simmer for 30 minutes. Drain, and cool.

While the citrus is simmering, toast the almonds. Preheat the oven to 325°F, and set a rack in the middle position. Put the almonds on an ungreased sheet pan, and bake until they look golden and smell toasty, 10 to 15 minutes. Set aside to cool completely. When the almonds are cool, pulse them in a food processor until finely ground, the texture of coarse sand. Set aside.

Set the oven to 350°F, and grease a 9-inch round springform pan.

When the citrus is cool, cut the lemon in half, and scoop out and discard the pulp and seeds. Cut the orange in half, and discard the seeds. Put the lemon rind and orange halves in the food processor – there’s no need to wash it after grinding the almonds – and process to chop finely, almost to a coarse paste.

In a small bowl, whisk together the flour and baking powder.

Combine the eggs and salt in a mixing bowl. Beat until foamy. Gradually beat in the sugar. Fold in the flour mixture. Add the citrus, almonds, and olive oil, and beat on low speed to just incorporate. Do not overmix. Pour the batter into the prepared pan, and bake for about 1 hour, or until a toothpick inserted in the center comes out clean. Cool the cake in its pan on a wire rack. Remove the sides of the pan. Dust the cake with confectioners’ sugar.

Store it at room temperature, covered with plastic wrap.

Makes 8-10 servings.


Recipe from Orangette. (Thank you! I am eternally grateful.)

2.22.2010

虎 Dan's Steamed Dumplings 虎

 
Happy (belated) Chinese New Year! It's the Year of the Tiger ( ), and Dan, my very own tiger (1974), thought we ought to celebrate by making one of the major foods eaten during this festive time in China...steamed dumplings. He's been traveling to China regularly for a little more than ten years, eating his share of them, so I was happy to let him take the lead on this one. Not only did he take it - he ran with it. I was so impressed with these (and him). He incorporated the perfect little touch: placing a thin slice of cucumber under each dumpling in the steamer. This not only looks lovely, but it serves a purpose as well. The dumplings don't stick to the steamer, are easier to remove, and the bottoms stay in tact keeping the delicious juices inside. Be sure to remove them when you eat the dumplings, though. Unless, of course, you like your dumplings with a soggy cucumber slice attached to the bottom.

I did a whole lot of nothing, except run to the store, cheer him on, pop dumpling after dumpling in my mouth, and photograph his work. Honestly, these are delightful. The filling possibilities are endless, and if you are in the mood you can saute them in a little peanut oil instead of steaming.

We (Dan) made two different kinds: pork and brown mushroom. Both were delicious, but again the sky's the limit here. 


 For pork filling:
          1 cup ground pork
          1/4 cup chopped scallion
          1/4 cup chopped cabbage
          1 teaspoon minced garlic
          1 teaspoon minced fresh ginger
          salt and pepper to taste
          1 tablespoon soy sauce
          1 teaspoon dark sesame oil
          3/4 cups water, plus a little more

For mushroom filling:
          1 pound Napa Cabbage, chopped
          salt and pepper to taste
          1 cup chopped brown mushrooms
          2 tablespoons chopped scallion
          1 teaspoon minced garlic
          1 teaspoon minced ginger
          1 teaspoon rice wine vinegar
          3/4 cups water, plus a little more

24-48 wonton wrappers

For the pork: process the first eight ingredients in a food processor or blender.
For the mushroom: process the first seven ingredients in a food processor or blender.

Place one rounded teaspoon of filling on each wonton wrapper. Brush a tiny bit of water along the perimeter of the wrapper, then fold the wrapper's opposite corners together (twice). Seal together with your fingers.


Set up a steamer with the 3/4 cups water. Steam the dumplings in several batches for about ten minutes per batch. Serve hot with dipping sauce.

Each filling recipe makes approximately 24 dumplings.


Pork recipe adapted from Mark Bittman, How to Cook Everything.
Mushroom recipe adapted from Virginia Madison, Vegetarian Cooking for Everyone.

2.21.2010

Charred Tomatillo Salsa with Homemade Tortilla Chips

I am, by nature, a red salsa maker. I always have red tomatoes on the vine around, and consequently they have been my default for fresh salsa for years. But recently tomatillos have been on my mind. They won my heart while making John Ash's "White Bean Chicken Chili" a couple of weeks ago, and since then I've been thinking that I need to work on my relationship with these relatives of my beloved tomatoes. I find them quite charming with their curious husks and beautiful bright green color. And I've always loved green salsa - making it at home just doesn't occur to me. I'm a creature of habit and the salsa I make is red. This weekend, though, in an effort to break out of my comfy, cozy, little red salsa box, I decided to make a "salsa verde".

The tomatillos release their flavor when their skins are charred and their flesh is softened a bit. I put them in the broiler for just under ten minutes, turning once and they were perfect. Then I realized I didn't have any tortilla chips in the pantry so... (ahem) I made some. It was my first time, and honestly, they tasted far better than any store-bought brand I've ever liked. And they were so easy - I really believe I'll think twice before buying them next time I find myself standing in the chip aisle at the market. 

I adapted a recipe from Martha Stewart (I know what you're thinking...Martha Stewart for Mexican salsa?) Yes. Martha Stewart for anything. She doesn't disappoint, people. 

If you prefer jalapenos, you can certainly substitute them for the serranos. I like my salsa spicy, but if you like milder salsa, you can use two serranos instead of three. Also, I think next time I'll try using shallots instead of the onion. And then there's the mint. I kind of feel that it was "eh". Not sure I'll include it next time, but definitely worth a try. You might love it.


          2 pounds tomatillos, husks removed, rinsed, and patted dry
          1 cup onion, cut into 1-inch pieces 
          3 serrano chiles, coarsely chopped
          2 tablespoons freshly squeezed lime juice
          3 tablespoons chopped fresh cilantro
          2 tablespoons chopped fresh mint
          1 1/2 teaspoons coarse salt

Preheat broiler with rack set in upper position. Place tomatillos on a rimmed baking sheet and broil, turning once, until skins are blistered and charred, about 10 minutes. Remove from broiler. Transfer baking sheet to a wire rack and let cool on baking sheet.

Meanwhile, place onion, chiles, lime juice, cilantro, mint, and salt in the bowl of a food processor. Quarter tomatillos and add them, along with any accumulated juices from the baking sheet, to the bowl of the food processor; pulse just until combined.

Transfer salsa to refrigerator and let chill before serving. Salsa can be stored in an airtight container in the refrigerator for up to one week.

Makes about 4 cups.


To make homemade tortilla chips:

          6 corn tortillas
          1/4 cup canola oil
          salt to taste

Cut the tortillas in half, then in quarters, then in eighths.

Heat the oil in a large skillet over medium heat. Add the tortilla chips, twelve at a time. Fry for about 15-20 seconds, then turn and leave another 10-15 seconds more or until golden.

Pat dry to remove excess oil.

Makes 4 dozen chips.


Adapted from Martha Stewart.

2.16.2010

Chocolate Puddle Cookies

 
What better way to celebrate the end of our refined sugar fast, than by baking something sweet for my honey on Valentine's Day weekend? If you don't live under a rock, surely you've noticed that for the last several weeks you cannot turn around without bumping into a decadent dessert. Because it's February, the recipes for sweet treats have been ubiquitous. I was torn between a couple of persuasive recipes for "mini chocolate desserts" in this month's Sunset, and about 47 other beautiful ideas found on the many fantastic food sites I love to read. In the end, I decided on this recipe for "Chocolate Puddle Cookies" from one of my favorite sites, 101 Cookbooks. What intrigued me about these, was that they are flourless and butterless. That's right - cookies free of flour and butter. How is this possible? Because they have an indecent quantity of confectioner's sugar. The description read that they are somewhere between a fudge brownie and a soft meringue. That did it for me. It took me all of about 3 seconds to think, "Hmmmmmmm, OKAY!" 

These were a complete success, but I have to stress that not under or over baking here is key. If you underbake, they will stick to the parchment paper and fall apart as you try to remove them after they've cooled. If you overbake, the tops will be too crispy. As amazing as they were, I must admit they were just a tad too sweet for my taste. If you love chocolate and really sweet cookies, you won't be disappointed. They'd also make a great dessert for someone who doesn't eat gluten or dairy.


                     3 cups walnut halves, toasted & cooled
                     4 cups confectioner's sugar
                     1/2 cup plus 3 tablespoons unsweetened cocoa powder
                     scant 1/2 teaspoon fine grain sea salt
                     4 large egg whites, room temperature
                     1 tablespoon high-quality vanilla extract
Preheat oven to 320F degrees and position racks in the top and bottom third. Line three (preferably rimmed) baking sheets with parchment paper. Or you can bake in batches with fewer pans.

Make sure your walnuts have cooled a bit, then chop coarsely and set aside. Sift together the confectioner's sugar, cocoa powder, and sea salt. Stir in the walnuts, then add the egg whites and vanilla. Stir until well combined.

Spoon the batter onto the prepared sheets in mounds of about 2 tablespoons each, allowing for PLENTY of room between cookies. These cookies really expand. Don't try to get more than 6 cookies on each sheet, and try to avoid placing the batter too close to the edge of the pan.

Bake until they puff up. The tops should get glossy, and then crack a bit - about 12 -15 minutes. Have faith, they look sad at first, then really blossom. You may want to rotate the pans top/bottom/back/front.
Slide the cookies still on parchment onto a cooling rack, and let them cool completely. They will keep in an airtight for a couple days.

Makes 18 large cookies.


From 101 Cookbooks.

2.12.2010

White Bean and Chicken Chili (with fixins!)


What drew me the most to this fantastic recipe by John Ash, was the great number of fabulous ingredients that grace the top of this yummy bowl of chili. I'll admit, the poblano peppers, tomatillos, and navy beans were all quite convincing - but when I read what this chili is served with.....I swear, my heart skipped a beat. My mouth might have even fallen open (slightly). I get weak in the knees for toppings. I have a thing for texture.

The chili itself is worth writing home about, too. All around, this dish was a winner. A hit. A home run. I think I asked Dan, "Isn't it soooooo goooooood?" at least three times. Poor guy. He's so patient with me. The combination of spices is perfect (a dash of unexpected cinnamon is genius). I'll just say this....I LOVED IT.

John Ash, as you may know, has a lovely little book called From The Earth To The Table. The book focuses on local and seasonal wine country fare, and the dishes are prepared with diverse and seductive ingredients. He has a wonderful writing style - it's the kind of book that makes you feel like you know the author personally. I love his tips on technique and every dish has a recommended wine pairing, of course. Ash writes that this is his "Wine Country Super Bowl Sunday favorite". Now it's mine, too.

A couple of points:

I don't love preparing chicken. I get all paranoid and overly cautious about salmonilla and cleanliness and whatnot. At most, I'll rinse boneless skinless breasts and poach them for shredding. Dan's really the raw chicken man. He cleans, marinates, grills, broils, etc. I'm a lucky girl. So having said that, I decided to make this chili in the morning because we were having it for an early dinner with Dan's parents. This recipe calls for chicken thighs, which I was very excited to buy, as I imagined they would lend a rich flavor that you just don't get with white meat. I knew thighs were fatty, but WOW. After 45 minutes of repeated semi-lethal attempts to cut off the fat before cubing, I finally gave up and ended up throwing away 70% of the meat. I know. Terribly wasteful (I'm still harboring guilt over it). But I was so tremendously displeased with, and a little repulsed by the whole event of "dealing with the chicken thighs", that I couldn't go on. Besides, I had completely mutilated the poor things. They were not salvagable. It was actually an awful mess and a horrible sight. The fix? I picked up a freshly roasted chicken and carved off the best pieces of dark meat.

One of the garnishes called for is corn chips. I much prefer the taste of fresh tortilla strips baked until crisp in the toaster oven and highly recommend doing this instead. It's quick and worth the little trouble it entails.


                      1 pound dried small white beans (I used navy)
                      5 cups chicken stock
                      1 1/4 pounds boneless, skinless chicken thighs, cubed
                      sea salt and freshly ground pepper
                      4 tablespoons olive oil
                      1 cup onion, diced
                      2 tablespoons garlic, chopped
                      2 medium fresh poblano chiles, chopped
                      1 tablespoon ground cumin
                      1 tablespoon dried oregano
                      1/2 teaspoon ground cinnamon
                      1/4 teaspoon red pepper flakes
                      2 cups fresh tomatillos, chopped
                      1/3 cup fresh cilantro, chopped

Rinse the beans well, put in a large bowl, cover with cool water by at least 3 inches, and soak overnight. Drain the beans, put in a large pot with the stock, and bring to a boil over high heat. Reduce the heat and simmer, partially covered, until the beans are tender, anywhere from 30 minutes to an hour or more depending on the bean used. Check to make sure the beans are covered with stock while cooking. Add more stock or water if needed.

Season the chicken with salt and pepper. In a large saute pan, heat the olive oil over medium-high heat and quickly brown the chicken on all sides. Set aside. Add the onion, garlic and chiles to the pan and saute for 5 minutes or until the vegetables are lightly colored. Add the cumin, oregano, cinnamon, and pepper flakes and saute for a minute or two longer. Add the chicken, onion mixture, and tomatillos to the beans. If there are any browned bits in the saute pan, deglaze with a little white wine or water, scrape the bottom, and add to the pot.

Bring the chili to a simmer, cover, and cook until the chicken is cooked through, 8 to 10 minutes. Season to taste with salt, pepper, and additional pepper flakes, if using. Stir in the cilantro just before serving.

Serve with finely sliced raw green cabbage, sliced radishes, chopped avocados, lime wedges, corn chips, and grated Jack cheese on the side.


 Recipe by John Ash, From The Earth To The Table.

2.10.2010

Midday Meal: Cannellini Beans and Tuscan Kale


Lunchtime! After taking inventory of the refrigerator's contents, I settled on making use of some leftover cannellini beans and a bunch of beautiful Tuscan kale we picked up from the farmers' market Sunday. Inspired by Heidi Swanson's "Giant Crusty and Creamy White Beans" recipe from her book Super Natural Cooking, but short on time (and not feeling the whole buttery sauteed onions and garlic bit), I first lightly browned the beans in a pan with some olive oil, salt and pepper, and then threw in the kale. The beans had some great texture and a drizzle of olive oil and some freshly grated parmesan were all this quick lunch needed to feel special and yummy. Quick, easy, satisfying.

2.08.2010

Plum Galette

 
I found some plums at Henry's on Saturday. Disclosure: they're from Chile. Of course they're not in season right now. The only fruit besides citrus in season right now is apples. So forgive me, local and seasonal ones, but I needed a plum pick me up since it was a rainy day and these were practically shouting at me from the produce section..."Yooooo hooo. Over here." 

I got them home and decided on a simple, rustic galette. Because we're halfway through our "no refined sugar" abstention, I wanted to use the mascobado sugar I bought a couple of weeks ago. I was really impressed with the taste and quality. It was my first time using it and I highly recommend it. The recipe I modified was Martha's, and it called for very little sugar (which I reduced even further). The only thing I am feeling remorse over is the butter. Now I normally don't have much butter guilt, but this was a little obscene. Maybe it's because I'm not really a baker, so I don't come into contact with recipes that call for 2 sticks of butter often. But I couldn't believe that I had made the pate brisee correctly when it was all said and done. My hands looked like I had taken a stick of butter to every square inch of them. Dan's the turner and roller, and he kept assuring me that it was fine. I insisted it couldn't possibly be, however he was right. It was perfect. And I'm so impressed with what a simple egg wash over the pastry will do...

I made a few other changes based on what I had on hand. I didn't have hazelnuts, so I substituted almonds, and after a bit of research online, I learned that in place of cornstarch, you can double the amount and use flour. This was revolutionary for me. Also, the recipe called for plum or red currant jam. I used one from Trader Joe's (nope - you didn't catch me...it's fruit juice sweetened) called Superfruit. It's a blend of Morello cherry, red grape, blueberry and pomegranate and it worked beautifully. I can't wait to make this again with whatever is in season  - pears, peaches, apricots.

For the pate brisee:
         
          2 1/2 cups all-purpose flour
          1 teaspoon salt
          8 ounces chilled unsalted butter (2 sticks)
          1/2 cup ice water

In the bowl of a food processor fitted with the metal blade, pulse the flour and salt. Add the butter and pulse until the mixture resembles coarse meal, about 15 seconds. With the machine running, add the water in a slow, steady stream; process until the dough just holds together. Turn it out onto a piece of plastic wrap, and flatten into a disk; wrap well. Chill for at least 1 hour in the refrigerator.

For the galette:

          1 tablespoon all-purpose flour, plus more for work surface 
          pate brisee
          1/2 cup finely ground toasted almonds
          3 tablespoons mascobado sugar
          2 tablespoons flour (to replace 1 tablespoon cornstarch)
          1/4 teaspoon salt
          1 1/2 pounds (about 5) plums, sliced into 1/2-inch-thick wedges
          1 large egg, lightly beaten
          1/2 cup jam (preferably red)

Preheat the oven to 425 degrees with the rack positioned in the lower third. On a lightly floured work surface, roll out the pate brisee to 1/8 inch thick. Trim the edges to form a rectangle, and transfer to a parchment-lined baking sheet. In a small bowl, combine the flour, almonds, 2 tablespoons of the sugar, flour, and salt; spread to cover the middle of the dough, leaving enough of a border all around (depending on the size of your rectangle) so that you can fold the dough back over on to the plums. 

Arrange the plums in rows on top, slightly overlapping the slices and alternating the direction of each row. Sprinkle the plums with the remaining tablespoon of sugar. Fold the dough to enclose the edges; then brush it with the egg wash. Chill for 30 minutes in the refrigerator. 

Bake for 10 minutes, then reduce the heat to 400 degrees and bake until the pastry is golden brown and plums are softened, about 30 minutes. Transfer to a wire rack; let cool to room temperature. Heat the jam in a small saucepan over low heat, stirring until melted. Let cool for a few minutes, then brush evenly over the plum slices. Serve. 


Adapted from Martha Stewart.

2.05.2010

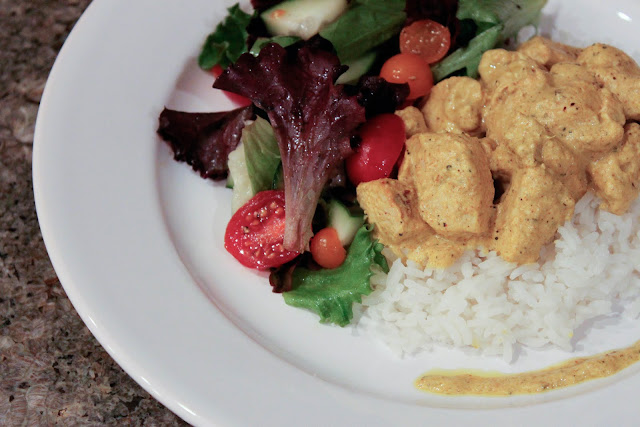
Chicken Tikka Masala...Eight Years Later

 I came to realize last night that I have been wanting to make Chicken Tikka Masala for eight years. Eight years. Eight years of thinking about this. Wow. Okay, maybe not every day for eight years. Or every week, for that matter. But still. WHY had I not done something (especially something like make Chicken Tikka Masala) that I have wanted to do for eight years until last night? (Sigh.) It's a rhetorical question, people.

In 2002, I was living in Sausalito around the corner from a fabulous little (and i mean little) Indian place called Sartaj. I believe it's still there - for the sake of my Bay Area friends, I really hope it is. It was a tiny, family-owned operation. No more than 4 tables, and maybe 2 out on the sidewalk. I loved going there. The family was always in good spirits and the food was nothing fancy but seemingly authentic and definitely fresh. It had that home-cooked quality...my patience was often put to the test while waiting for the plate, which in that kind of environment usually means the food is being cooked to order and well looked after. (Sidenote: Isn't it unnerving when you're at an Asian restaurant with 227 entrees that have corresponding numbers and 6 minutes after you order your food it appears?)

Now I am certainly not presumptuous enough to pretend that mine was as good as Sartaj. But it was very good. I made the Masala marinade around noon so it and the chicken would have enough time to get to know one another in the fridge. The bamboo skewers were soaked for thirty minutes before skewering and broiling. By the way, I learned that tikka means meat cooked on skewers.

I more or less followed a recipe from Gourmet and threw together a simple salad with heirloom cherry tomatoes, cucumbers, and a light vinaigrette. We opted for basmati rice. (I know, I know, I just wrote recently that we use whole grains as often as possible. Well, last night we didn't.) For my veggie friends, I can't wait to make this with tofu or tempeh.

                    1/4 teaspoon cumin
                    1/4 teaspoon coriander
                    1 cup plain yogurt
                    2 garlic cloves
                    1 (1 1/2-inch) piece fresh ginger
                    1 1/2 tablespoons vegetable oil
                    1 tablespoon fresh lime juice
                    1/2 teaspoon salt
                    1/4 teaspoon ground turmeric
                    1/2 teaspoon garam masala
                    1/4 teaspoon black pepper
                    1/4 teaspoon cayenne
                    1 lb cubed skinless boneless chicken breasts
                    bamboo skewers

Puree all of the ingredients except the chicken in a blender.

Combine the chicken and yogurt mixture in a large bowl, stirring or turning to coat. Marinate covered and chilled for at least 4 hours.

Soak the skewers in water for 30 minutes. While they are soaking, bring the chicken to room temperature. Preheat the broiler and brush a baking sheet or broiler pan lightly with oil.

Divide the chicken among the skewers, leaving an 1/8-inch space between cubes, and arrange around 5 skewers across the pan. Broil the chicken 4 inches from the heat, turning once, until it is browned in spots and just cooked through, 9 to 12 minutes total.

Remove the chicken from the skewers and serve warm or at room temperature over rice.

Makes 2 servings.

Adapted from Gourmet, April 2004.

2.04.2010

Spicy Roasted Chickpeas with Agave and Rosemary


A roasted chickpea craze is sweeping the nation, everyone. Actually, it has been for about a year. I can't turn around without bumping into another recipe for these in the world of food online. If you don't believe me, please click on this: (more ways to prepare roasted chickpeas). Here you will find no less than 15 flavor combinations to choose from. I'm not kidding. 

My parents' neighbor, the very talented Marika Felactu, brings them the most delicious spiced nuts. I have tried both her pecans and cashews. When my mom had them out last weekend during our visit, I had to have the recipe. Marika uses butter, brown sugar or maple syrup, rosemary and cayenne and was kind enough to email instructions over. I decided to fuse the two ideas. 

I omitted the butter and substituted olive oil, and also swapped the sugar/maple for agave nectar. These are a super healthy, tasty, and addictive snack to have around. But remember that they are beans, after all. So it's probably wise to control yourself.  :)

                   1 lb. dried chickpeas
                   2 1/2 tablespoons olive oil
                   1/2 teaspoon salt
                   1 tablespoon agave nectar
                   2 tablespoons fresh rosemary, chopped
                   1-2 teaspoons cayenne (depending on your taste)
                   
Soak the chickpeas in enough water to cover by 3 inches overnight or for at least 8 hours. You can also use canned, in which case skip this step altogether and jump right in.

Toss them with the salt and 1/2 tablespoon of the oil, and toast at 350 for 45-50 minutes, or until golden and crunchy (try one). Set them aside.

When the chickpeas are almost done toasting, warm the rest of the oil in a small skillet over low heat. Add the agave and swirl around to combine. Add the rosemary and sautee until fragrant for a couple of minutes. Lastly, add the cayenne and combine well.

Allow the chickpeas to cool, and then put them in a medium-sized mixing bowl. Pour the oil mixture over and toss well. Add salt to taste. Store in an airtight container.


Adapted from recipes by thekitchn.com and Marika Felactu.

2.03.2010

Peppery Pasta Carbonara

 
Dan and I are on the third day of not eating refined sugar for two weeks (something we cruelly impose upon ourselves regularly), and the first few days are always the hardest. So, I figured a naughty treat like pasta carbonara was in order. Although to be honest, this isn't really that naughty, and I'm not sure an Italian would call this true carbonara, as there was no egg used to cook the pasta in, nor did we use guanciale or pancetta. No, folks....this was weeknight counterfeit carbonara with....(gasp!) whole wheat spaghetti. I know. Sinfully inauthentic. Sacrilege. Blasphemy. Quite good, though.

The recipe used was one adapted from Gourmet, and it called for bacon as a quick alternative to guanciale. I found some organic, hormone and antibiotic-free, humanely raised (yes, important to us if we're going to eat meat) bacon at Henry's, and decided on the whole wheat spaghetti because we aim to eat whole grain as often as possible, and actually, it tastes better to me. We made a couple of minor changes, like omitting the poached egg on top and not cooking the pasta in the leftover bacon fat (!). 

The result was gratifying, and dare I say heavenly? Although to be fair, you could wrap bacon around some cardboard and I'd probably eat it. For my veggie friends, I'd recommend adding sauteed broccoli rabe or something along those lines. Maybe even fresh peas when they're in season. Mmmmm.

We opted for a simple salad of greens and heirloom cherry tomatoes on the side to keep things light. Well, okay, to make ourselves feel a little better about eating a dish with bacon, butter and a bit of cream. 

                    5 bacon slices, cut into 1-inch pieces
                    1/2 package whole wheat spaghetti
                    3/4 tablespoon unsalted butter
                    1/4 milk or soy milk (unsweetened)
                    1 tablespoon cream
                    2/3 cup grated Parmesan plus additional for serving
                    1/4 teaspoon pepper
                    2 tablespoons parsley, chopped

Cook the bacon in a large skillet over medium heat until crisp. Transfer it with a slotted spoon to paper towels to drain.

Meanwhile, cook the spaghetti in a saucepan of salted boiling water until al dente. Drain it well and shake off any excess water.

Melt the butter into the skillet used to cook the bacon. Add the spaghetti, milk, cream, and a rounded 1/4 teaspoon pepper and cook, stirring, until sauce is thickened and almost completely absorbed, 2 to 3 minutes. Add the bacon and parsley and toss. If you feel that the mixture is too dry, feel free to add a splash of olive oil, although we didn't find this necessary. Add the cheese during the final moment of cooking. Season with salt and pepper.

Revel in the joy of buttery, creamy pasta.

Repent in the morning.


Makes 2 servings.

Adapted from Gourmet, October 2009.

Kale Chips


I've been reading the hype about "kale chips" on foodie sites and blogs for a while and decided it was time to try it when Dan came home with two bunches of kale on Monday night, not one. I mean it was obvious, right? Clearly, the time to make the kale chips had arrived...... "Okay, universe! I get it!"

I am so thrilled with these. They were extremely quick, easy, and truly delicious. We ate the whole batch while making dinner. Silly me for thinking they'd be a healthy snack to have around for today. Call me insane, but I can honestly say that I would rather munch on these than potato chips. I'm not kidding. They are light, thin, crispy, and delightful. I think I could eat them every day. And no guilt! Someone pinch me.

After tearing the kale leaves into bite sized pieces, I tossed them with some olive oil and salt, the way I would a salad but with a little more oil (and salt!). Then I transferred them to a baking sheet and popped them in the oven for 10-15 minutes at 350, checking a couple of times and stirring to even the crisping. Many of the recipes out there suggest drizzling the oil over the kale on the baking sheet. I thought tossing would make for a better chip.

Please. Try these.